Off-Roading 101: Beginner 4WD Basics, Gear & Tire Pressures

Off-Roading 101: Your First Steps onto the Dirt
Brand-new to off-road driving? Perfect. This guide walks you through the basics—what your 4WD buttons actually do, the few pieces of gear you really need, and the single best skill that makes everything easier (hint: it’s tire pressure). We’ll keep it practical, safe, and just nerdy enough to make you dangerous—in a responsible, trail-friendly way.
Know your vehicle
4WD high vs. low (and when to use them)
- 4H (High): Mild dirt, gravel, rain, snow—anywhere you want extra traction at normal road speeds.
- 4L (Low): Steep climbs/descents, technical rocks, deep sand or mud—slow, controlled, high-torque work.
- Don’t force it: Shift on flat ground while rolling slowly. If it balks, stop, select neutral, try again.
Traction aids—what those lights and buttons mean
- Traction control: Brakes a spinning wheel so power goes to the wheel with grip. Leave it on unless it’s cutting too much power in sand—then try “off” or “off-road” mode if available.
- Locking differentials: Forces both wheels on an axle (and sometimes front + rear) to turn together. Use at low speed on loose surfaces; unlock before tight turns on grippy ground.
- Hill descent control: Your downhill cruise control. Set a slow speed and steer.
Know your numbers
- Ground clearance: Lowest point under your rig.
- Angles: Approach (front), departure (rear), breakover (center). Big bumpers + hitches = smaller numbers.
- Translation: If your breakover is so-so, straddle the bump—don’t center-punch it with your belly.
Five-minute pre-trip check
- Fluids (oil, coolant, washer), belts/hoses, battery terminals, and obvious leaks.
- Tires: pressure, sidewalls, tread; torque your lugs if you recently rotated.
- Recovery points: Make sure rated front/rear points exist and are tight.
Essential gear for beginners
Start simple. These items cover 95% of beginner needs without turning your cargo area into a mobile hardware store.
Must-haves


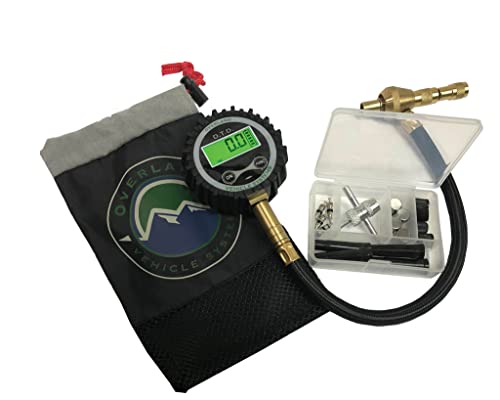

- Portable air compressor that clips to the battery (faster, more reliable than cig-lighter types).
- Compact shovel — see option
- Sturdy gloves — see option
Safety first


Personal kit

- Water: 2 L per person (minimum), snacks/meal, sun protection, warm layer, hat.
- Nice-to-have: basic tool roll, tarp/ground sheet—keeps you out of “mystery puddles.”
Disclosure: Some links/images above go to Amazon. As an Amazon Associate we may earn from qualifying purchases—this never affects our editorial verdict.
The single most important skill: adjusting tire pressure
Lower pressure = a longer, wider contact patch. Translation: more grip, less banging, smoother ride. It’s also the cheapest “suspension upgrade” you’ll ever feel.
- Graded dirt/gravel: 22–28 psi
- Rocks/slow trails: 16–22 psi
- Sand/snow: 12–18 psi (go lower only with great care—watch for de-beads)
Airing back up: Do it before pavement. Low pressure + highway speed = hot tires, sidewall damage, and sad handling.
Pro tip: If a tire spins, stop and air down more before you dig yourself to Australia.
Quick driveway drill (10 minutes)
- Note current street pressure (say 36 psi).
- Deflate all four to 22 psi; drive around the block (slowly) and feel the difference over potholes.
- Re-inflate to 36 psi with your compressor. Time how long it takes so you know what to expect on trail days.
Finding a place to learn
- Search for legal, beginner-friendly trails in state forests, OHV parks, and public lands. Look for “easy” or “green” ratings.
- Local clubs/groups = instant mentors. Tag along, ask questions, bring snacks.
- Practice one variable at a time: same trail, different pressures; same obstacle, different lines.
Off-road etiquette
- Tread Lightly: Stay on existing trails; avoid spinning tires and widening tracks.
- Right of way: Uphill traffic has priority; the stopped vehicle yields.
- Be courteous: Close gates, don’t block obstacles, pack out trash. Leave it better than you found it.
Common beginner mistakes (and quick fixes)
- Too much speed: If your dash looks like a snow globe, slow down—“as slow as possible, as fast as necessary.”
- Spinning tires: Stop, air down more, pick a new line, or build a little ramp with rocks/boards.
- Not getting out to look: The best mod is the pair of legs you already have. Walk it first.
- Recovery point roulette: Never attach to tie-downs or bumpers without rated points. Use the proper eyes or receiver shackle.
Next up in the series: Your First Day on the Trail: Mastering Off-Road Fundamentals.


Comments